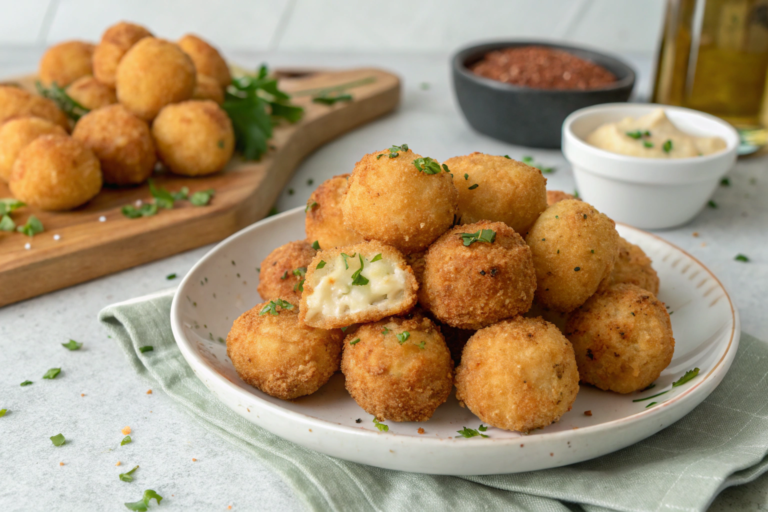
Crunchy potato balls are the perfect combination of crispy on the outside and soft, fluffy on the inside. They make for an irresistible snack, appetizer, or party dish that appeals to all ages. Whether served plain or with dipping sauces, these bite-sized delights are easy to prepare and can be customized with a variety of flavors and fillings. Their simplicity and versatility make them a must-try for anyone who loves comfort food with a crispy twist.
2. Ingredients Overview
– Essential Ingredients:
- Potatoes (Russet or Yukon Gold) – Ideal for their starchy texture, ensuring a fluffy interior.
- Salt and Pepper – Basic seasonings to enhance flavor.
- Breadcrumbs (Panko or Regular) – Creates the crunchy exterior.
- Eggs – Helps bind the ingredients and secures the breadcrumbs during coating.
- Flour – Coats the potato balls before dipping them in egg, aiding in crispiness.
- Oil (for frying) – Neutral oils like vegetable or canola oil work best for frying.
– Optional Add-ins for Extra Flavor:
- Cheese (Mozzarella, Cheddar, or Parmesan) – Adds a gooey, rich center.
- Bacon Bits or Ham – Provides a smoky, savory bite.
- Fresh Herbs (Parsley, Chives, or Thyme) – Brightens the flavor and adds a fresh touch.
- Spices (Paprika, Garlic Powder, or Chili Flakes) – Introduces warmth and depth to the mix.
3. Necessary Kitchen Tools
– Must-Have Tools:
- Large Pot – For boiling potatoes.
- Mixing Bowls – To mash potatoes and mix the ingredients.
- Potato Masher or Ricer – Ensures smooth, lump-free potatoes.
- Baking Tray – For shaping and chilling the potato balls.
- Deep Fryer or Skillet – For frying the balls to golden perfection.
– Alternative Equipment:
- Air Fryer – A healthier option for frying with less oil.
- Oven – Bakes the potato balls to a crispy finish if frying isn’t preferred.
- Food Processor – Speeds up the mashing process and creates a smooth texture.
4. Preparation Process
– Preparing the Potatoes:
- Boil the Potatoes – Peel and cut potatoes into chunks. Boil them in salted water until fork-tender, about 15-20 minutes.
- Drain and Mash – Drain the potatoes well and mash them until smooth. Let them cool slightly.
– Mixing and Seasoning:
- Add Seasoning – Mix the mashed potatoes with salt, pepper, and any add-ins like cheese or herbs.
- Shape the Balls – Scoop a tablespoon of the mixture and roll it into small balls. Place them on a tray.
- Coat – Roll each ball in flour, dip in beaten egg, and then coat with breadcrumbs.
With these simple steps, you’ll have delicious, crunchy potato balls ready to be fried or baked to golden perfection!
5. Shaping the Potato Balls
– Techniques for Perfect Spheres:
- Chill the Mixture – After mashing and seasoning, let the mixture cool in the refrigerator for 30 minutes. This firms up the potatoes, making them easier to handle.
- Use a Scoop – Use a cookie scoop or tablespoon to ensure uniform sizes. This not only helps with even cooking but also gives a consistent, professional look.
- Roll with Light Hands – Lightly grease your hands with oil or water to prevent sticking. Gently roll the mixture between your palms until smooth and round.
– Freezing Tips for Better Texture:
- Flash Freeze – Arrange the shaped potato balls on a baking sheet and freeze for 20-30 minutes before frying. This helps them hold their shape and prevents them from falling apart during cooking.
- Storage – Once partially frozen, transfer the balls to a freezer-safe container. They can be stored for up to 1 month and fried straight from the freezer.
6. Breading for Extra Crunch
– Choosing the Right Coating:
- Panko Breadcrumbs – Light and airy, providing maximum crunch.
- Regular Breadcrumbs – Creates a denser, more uniform crust.
- Crushed Cornflakes or Chips – For a unique, ultra-crispy twist.
- Parmesan Mixture – Combines breadcrumbs with grated parmesan for extra flavor.
– Layering for Maximum Crunch:
- Flour First – Roll each ball lightly in flour to create a base layer that helps the egg stick.
- Egg Dip – Dip the floured ball into a bowl of beaten egg, coating completely.
- Breadcrumb Finish – Roll the egg-coated ball in breadcrumbs, pressing gently to ensure an even layer.
Pro Tip: Double coat by repeating the egg and breadcrumb process for an extra-thick crust.
7. Frying Techniques
– Best Oils for Frying:
- Vegetable Oil – Neutral and affordable, heats evenly.
- Canola Oil – Light flavor and high smoke point, ideal for deep frying.
- Sunflower Oil – Clean and crisp, perfect for golden results.
- Peanut Oil – Imparts a subtle nutty flavor and resists burning.
– Perfect Frying Temperature:
- Heat Oil to 350-375°F (175-190°C).
- Use a thermometer to monitor the oil temperature. Frying at the right temperature prevents the balls from absorbing too much oil and becoming greasy.
- Batch Frying: Fry in small batches, 4-5 at a time, to avoid overcrowding the pan and lowering the oil temperature.
8. Baking Alternative
– How to Bake Potato Balls for a Healthier Option:
- Preheat the Oven – Set to 400°F (200°C).
- Line a Baking Tray – Place the potato balls on a parchment-lined tray. Lightly brush or spray with oil.
- Bake for 20-25 Minutes – Flip halfway through for even browning.
– Achieving the Crunch Without Frying:
- Use panko breadcrumbs for a crispier texture when baking.
- For extra crunch, broil the balls for 2-3 minutes at the end of baking.
9. Serving Suggestions
– Dipping Sauces:
- Garlic Aioli – Creamy and rich with a hint of garlic.
- Spicy Sriracha Mayo – Adds a kick to every bite.
- Honey Mustard – Sweet and tangy, perfect for balancing the savory flavor.
- Classic Marinara – A tomato-based dip for a traditional touch.
– Side Dishes That Complement:
- Fresh Garden Salad – Adds a refreshing contrast to the rich, crunchy potato balls.
- Roasted Vegetables – A healthier, flavorful accompaniment.
- Coleslaw – Creamy and crunchy, it pairs perfectly as a side.
- Soup – Serve with a bowl of tomato or vegetable soup for a complete meal.
10. Common Mistakes to Avoid
– Overcrowding the Pan:
- Frying too many potato balls at once reduces the oil temperature, leading to soggy results. Fry in small batches to maintain even heat.
– Using Too Much Moisture:
- Ensure the mashed potatoes are well-drained and not too watery. Excess moisture can cause the balls to fall apart during frying or baking.
- If the mixture feels too soft, add a bit of flour or cornstarch to help bind it.
By following these steps and avoiding common pitfalls, you’ll achieve perfectly crisp, golden potato balls every time. Enjoy experimenting with flavors, fillings, and dips to make them your own!
11. Storage and Reheating
– Storing Leftover Potato Balls:
- Refrigeration: Place leftover potato balls in an airtight container and refrigerate for up to 3 days. Ensure they cool completely before storing to prevent moisture buildup.
- Freezing: Arrange the cooked potato balls on a baking sheet and freeze until solid (about 1 hour). Then, transfer to a freezer-safe bag or container and store for up to 1 month.
– Reheating for Maximum Crunch:
- Oven Method: Preheat the oven to 375°F (190°C). Place potato balls on a baking sheet and heat for 10-12 minutes until crispy.
- Air Fryer: Reheat at 350°F (175°C) for 5-7 minutes. This method helps retain the crunch without excess oil.
- Avoid Microwaving: While convenient, microwaving can make potato balls soggy. Stick to oven or air fryer reheating for the best results.
12. Variations on Crunchy Potato Balls
– Cheese-Stuffed Potato Balls:
- Create a gooey center by inserting a cube of mozzarella, cheddar, or brie into the middle of each potato ball before shaping. The cheese melts during cooking, adding richness and flavor.
– Spicy Jalapeño Potato Balls:
- For a spicy kick, finely chop jalapeños or chili flakes and mix them into the potato mixture. Alternatively, stuff each ball with a slice of jalapeño for bursts of heat. Pair with a cooling dip like ranch or sour cream.
13. Healthier Alternatives
– Air Frying for Less Oil:
- Preheat the Air Fryer to 375°F (190°C). Lightly spray the potato balls with cooking oil and arrange them in the basket without overcrowding. Air fry for 10-12 minutes, shaking halfway through. This method results in a crispy exterior with minimal oil.
– Gluten-Free Options:
- Breadcrumb Substitute: Use gluten-free breadcrumbs or crushed rice crackers for coating.
- Binding: Substitute regular flour with gluten-free flour or cornstarch in the dredging process.
- Pasta Alternatives: If using cheese or pasta as add-ins, opt for gluten-free pasta or cheese products labeled gluten-free.
14. Nutritional Information
– Calorie Breakdown (Per Serving – 3 Potato Balls):
- Calories: ~180-250 (depending on filling and frying method)
- Protein: 4-6g
- Fat: 10-12g (lower if baked or air-fried)
- Carbohydrates: 20-25g
– Key Nutrients in Crunchy Potato Balls:
- Potatoes: Rich in vitamin C, potassium, and fiber. They provide energy and essential nutrients for muscle function.
- Cheese (if added): High in calcium and protein, supporting bone health.
- Breadcrumbs: Provide carbohydrates but can be swapped for whole-grain options for added fiber.
- Eggs (for coating): Supply protein, healthy fats, and essential vitamins like B12.
These variations and alternatives allow you to customize crunchy potato balls to fit dietary needs while maintaining their delicious flavor and texture. Enjoy them as a snack, appetizer, or side dish with healthier options or indulgent twists!
15. FAQs
1. How Can I Make Potato Balls Ahead of Time?
Yes! To make potato balls ahead of time, shape them and place them on a baking tray. Cover and refrigerate for up to 24 hours before frying or baking. Alternatively, freeze them for longer storage.
2. Can I Use Sweet Potatoes Instead?
Absolutely! Sweet potatoes add a slightly sweeter flavor and are packed with nutrients. Follow the same steps for boiling and mashing, but note that sweet potatoes are softer, so add extra flour or breadcrumbs to help with binding.
3. What Can I Do If My Potato Balls Fall Apart?
If your potato balls are falling apart:
- Add More Binding: Mix in extra flour, breadcrumbs, or an egg to help hold them together.
- Chill the Mixture: Refrigerate the potato mixture for 30 minutes before shaping to firm it up.
- Avoid Over-Mashing: Keep the texture slightly chunky to maintain structure.
4. How Do I Keep Potato Balls from Being Greasy?
- Fry at the Right Temperature: Ensure the oil is heated to 350-375°F (175-190°C). Too low, and the balls will absorb excess oil.
- Drain Properly: After frying, place the potato balls on a wire rack or paper towel to remove excess oil.
5. Can I Freeze Cooked Potato Balls?
Yes! Let the cooked potato balls cool completely, then freeze them in a single layer on a baking sheet. Once frozen, transfer to a freezer bag and store for up to 1 month. Reheat in the oven or air fryer to restore crispiness.
6. What Are the Best Dipping Sauces for This Snack?
Some great dipping options include:
- Garlic Aioli – Creamy and rich.
- Marinara Sauce – A classic tomato-based dip.
- Sriracha Mayo – Spicy and tangy.
- Honey Mustard – Sweet and sharp, perfect for balancing flavors.
- Ranch Dressing – Cool and creamy, great for spicy potato balls.
These FAQs ensure that you can master crunchy potato balls with confidence, troubleshoot any issues, and serve them with the perfect accompaniments!
Conclusion
Crunchy potato balls are a versatile, crowd-pleasing snack that can be customized to suit any taste. Whether you prefer classic, cheese-filled, or spicy variations, these golden bites are simple to make and perfect for any occasion. With options for frying, baking, or air-frying, you can enjoy them in a healthier way without sacrificing flavor or texture.
By following the tips for preparation, breading, and frying, you can achieve perfectly crisp and flavorful potato balls every time. Plus, with make-ahead and freezing options, they’re a convenient dish to prepare in advance for parties, family gatherings, or quick snacks.
Pair them with your favorite dipping sauces and sides, and you’ll have a dish that’s sure to impress. Enjoy experimenting with different ingredients and techniques to make this recipe your own – happy cooking!